Sunday, January 31, 2010

We're Jammin'..... and I hope you're NOT jammin' too.


The river near our home is flooding over it's banks in spots because of an ice jam that just won't go away.  Honestly, I'm kind of excited about it....but I think I'd feel differently if I lived in the flood zone. I was doing some grocery shopping when over the store intercom came a nervous voice announcing that the ice jam up river had broken and that we should immediately move our cars to higher spots in the parking lot because the flood would be here in five minutes. I dropped my basket and booked it out to the parking lot, where I proceeded to tell everyone within one hundred feet of me to reconsider shopping as the flood would be coming through in minutes.  I got a little wrapped up in the moment. Men with shiny SUV's scampered back to their vehicles a panic. I definitely startled at least one old lady.
And nothing happened. I waited for two hours by the river. 
The ice jam had "jammed" up again within a stones throw of my town. We're still waiting for it to move. No doubt when it does, it will get stuck again downstream of us and we'll find ourselves flooded. They've sent up Coast Guard cutters to break it up so that it has a clear path....and so that it doesn't wait to let loose until the spring when we *normally* go over the flood stage. That would not be so good. While the jam is around, I thought I'd take a few pictures. 
 
The Cutter getting ready to make some passes at the channel.

  
The river is quite low in some spot and fairly deep in others. It is also tidal....so when it's low tide, there are some pretty amazing shapes to see. 
  
This is the head of the jam. Though it doesn't look like much in this picture, it extends back up the river about half a mile. And it is solid. This ice is not like the soft thaw ice of spring. It is incredibly dense.


   So, who knows when it will break....or if it will wait until spring!! For now, there is a flood watch for the county. I'd better head back to Hannaford, just in case. You know, they really need nimble little samaritans like me to keep their customers up to speed on the latest flood information, to scare the bejeezus out of the elderly, and to keep the crowds inside the store at a manageable (i.e.dimished) level.

Wednesday, January 27, 2010

Homemade Valentine's Day Cards

  Paper Curling

What the world really needs is more love and less paper work.

Pearl Bailey


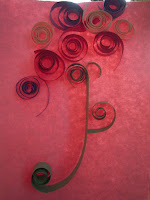
How about a little of both?? My daughter and I explored the art of paper curling or Quilling, something I only just recently learned about, in an effort to make some really fun Valentine's Day cards. Quilling is essentially curling thin pieces of paper around a stick of varying circumference to get different sized spirals of paper. Then you glue the spirals to something else, making a design of some kind, or even using it as scroll work around a piece of art. It very easy and you get some great results for such fun and simple work.


The top and right pictures my daughters designs and I really love the bouquet of colors. I was going to be traditional and stick with reds, pinks, and greens.....but she wanted blue, and I think it really makes it pop!! My girl has got a real sense of style.


So, for this craft you need:
  • Thin strips of colored paper (preferably the same width)

  • Slim wooden sticks (pencils, paintbrush ends, etc)  thicker = more open curls
  • glue
  • paper cards (I like to make mine to save some moolah ) 
Just curl the paper around the stick in one spot. Pull it off and allow it to open as much as you would like and then put a dab of glue on the inside of the loose tail and glue it to the rest to hold it together. Let it dry a bit.  Use the glue to make a design on a card. Arrange the curls as you would like, and allow them to dry. Experiment with different techniques: wrap two pieces at once, curl both ends of a strip of paper, fold the curl once it is off the pencil in one spot to make a spade shape (perfect for leaves and buds).....there are endless possibilities.....


Wednesday, January 20, 2010

Marbelized Card Tutorial


I first saw some marbelized paper craft on one of my favorite blogs Skip To My Lou and I was immediately intent on doing it. So, I did.

The Basic Recipe:
  1. Alum
  2. Liquid starch
  3. Paper
  4. Casserole sized pan
  5. Acrylic paint
Turns out, Alum isn't the greatest thing in the world for you, so bear that in mind if you've got some little ones running around the house. You won't want them sniffing/playing with it....it is something that is used in making pickles and Big Macs, but the jury is still out on whether is is okay for regular consumption (because pickles and big macs are irregular consumption....right?? **fingers crossed**). You can find it in your local Hannaford's spice aisle. The liquid starch was by far the hardest thing to locate on the list. I spent a lot of time zipping up and down the detergent section with no luck. I ended up making some of my own from cornstarch and hot water and it did some FUNKY stuff to the results. A few days after I tried the homemade starch, I found the liquid starch at our Renys store in town. The paper I got at A.C. Moore (it was a set of 50 ivory colored blank cards and envelopes). I buy those sets religiously every Christmas to make my cards. I found a cheap aluminum casserole pan at the grocery store at well. The acrylic paint was already at the house in great quantity.

The FUNKY Starch Recipe:
  
  1. 1/2 cup Cornstarch
  2. 1/2 cup cold water
  3. 2 cups boiling water

I mixed it all really well and added 2 tsps of alum, mixing it again. This was then poured into the disposable casserole dish.  The acrylic paint, I had read in many places, should be watered down or it will sink to the bottom of the starch mixture.  So I watered it down and put several different colors each into their own small bowl. To get the paint onto the surface of the starch I just used a large paintbrush and tapped it high over the mixture to get some little droplets to fall down. Once I had all the colors I needed, I used some toothpicks to swirl the paint on the surface and make the marbelized design. But, I hit a snag. Somehow my homemade mixture didn't want to work the way that I had intended it to. The paint wouldn't swirl....it just stayed chunky and congealed on the surface. I decided to try putting the paper on it anyway and I actually really liked how it turned out!!


Here is an image of one of the cards from the basic recipe made with liquid starch:


When placing the paper on mix, you put the side you want marbelized down and let it float on top for a minute or so. Then you rinse off the excess paint quickly (and easily) under the faucet. Lay it on some newspaper to dry and when it is completely dry you can flatten each folded card and pile them together and lay something heavy over them to "iron" it out. Or, you could do the real thing and actually iron. (I know....people DO THAT?!?!?)
I used these for some very funky holiday cards this season....and I was thrilled with the results. It's a fun, messy, marvelous project for those of you who like to get your hands a little dirty.